
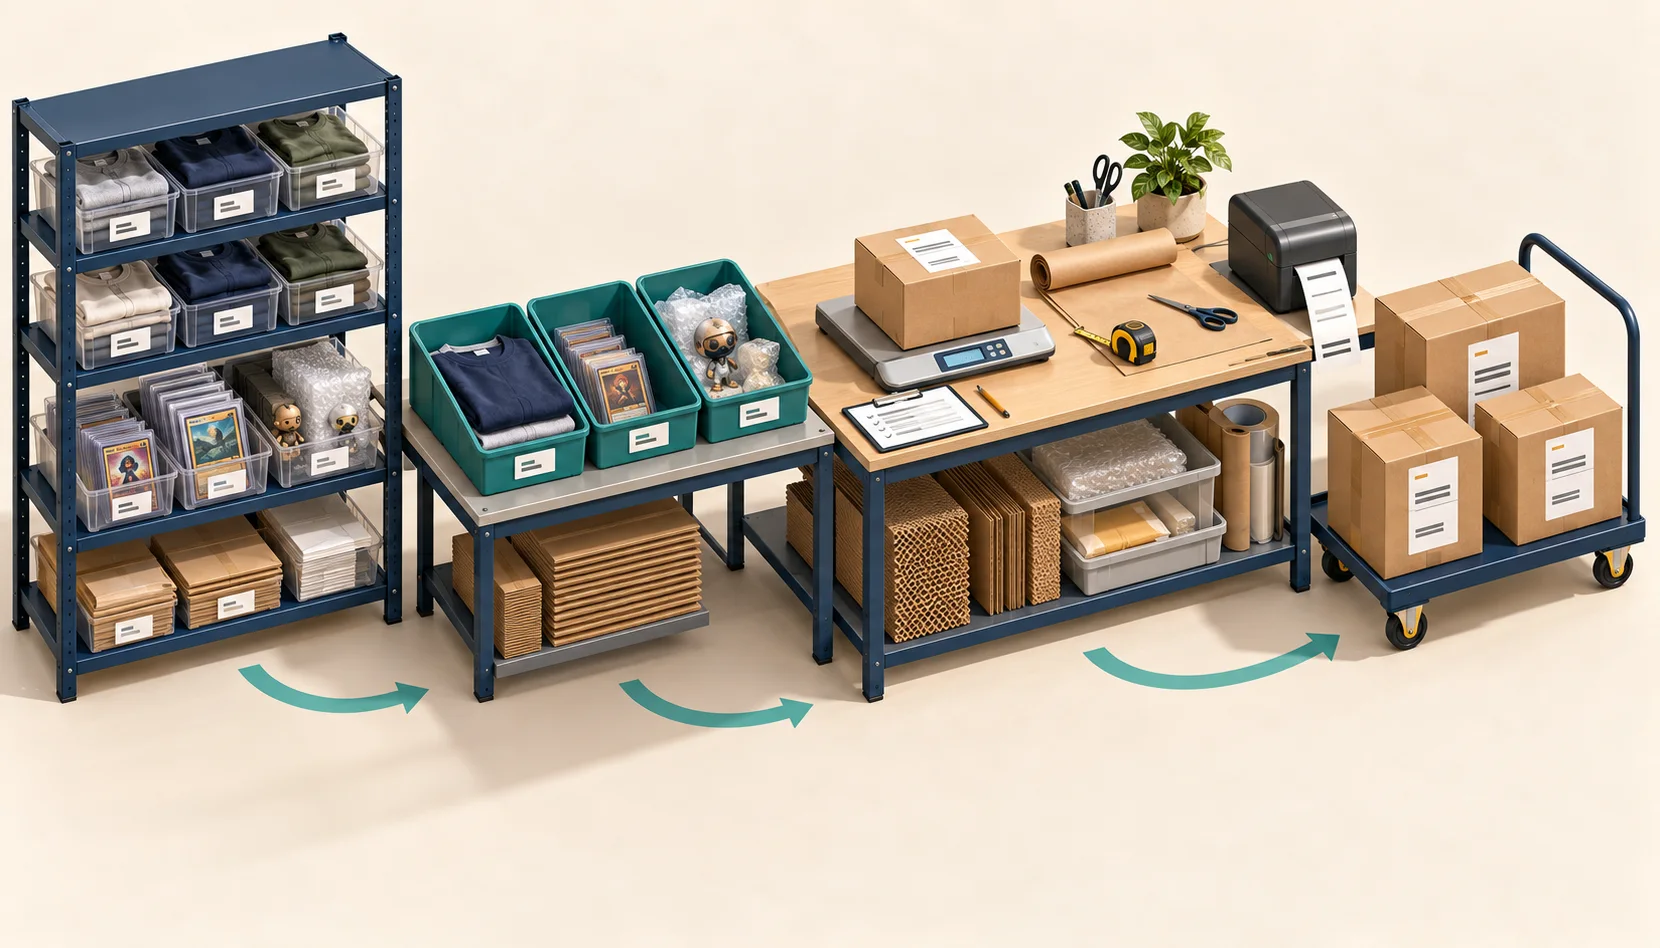
The order-to-carrier workflow in 30 seconds
Original silent animation with captions. Illustrative workflow and measurements; not a recording of the Whatnot app.
Read the video transcript
- Give each item a clear inventory ID. An optional 4×2 internal label is not postage.
- Keep each buyer’s items together in labeled bins.
- Verify the actual shipment grouping. One buyer may have more than one parcel.
- Weigh and measure the fully packed parcel, including packaging.
- Match the correct 4×6 carrier label to the order and keep its barcode flat.
- Scan each parcel at drop-off. The in-app scan is separate from carrier acceptance.
Research checked October 13, 2026. U.S.-first guide; international features are identified separately.
Affiliate disclosure: Purchases through tagged Amazon links may earn the link owner a commission. Recommendations below are based on documented specifications and workflow fit. No laboratory testing or hands-on performance results are claimed.
Start with the order you need to ship
A good Whatnot setup helps you answer four questions quickly: What sold? Who bought it? Which shipment does it belong in? Is the package ready for the carrier?
Buy supplies around those questions. A thermal printer can remove cutting and taping from the label routine. Two sensible mailer sizes can handle a modest apparel assortment. Clearly labeled bins can keep similar items apart. An automatic tape dispenser becomes useful when repeated tape cutting is a real bottleneck.
The best starter station is the one you can keep organized through a whole show and clear afterward. Save elaborate storage, extra printers, and production equipment for a problem you have actually measured.
The short shopping order
- A suitable place to pack, an accurate package scale, and a measuring tape.
- Packaging matched to your category and carrier service.
- Printer access and the correct label stock. An existing document printer is a valid starting point.
- A simple system for item IDs and buyer/order sorting.
- Shelving sized for the bins and boxes you actually use.
- Automation after the basic process is dependable.
Whatnot's standard fulfillment guidance calls for shipment within two business days, excluding weekends and holidays. Label creation alone does not finish shipping. Plan the carrier hand-off before scheduling the next show.
What changed recently, and why it changes your supply list
Plain packaging matters more now. Whatnot made USPS Ground Advantage its default USPS service on July 31, 2026. Priority Mail and Flat Rate packaging cannot be paired with Ground Advantage labels. Stock plain boxes or appropriate mailers if that is your service. Whatnot's published $12.99 Flat Rate offer is temporary through November 1, 2026; do not build a permanent budget around it. Recheck current rates before making shipping promises.
There is now an official live Sorting Labels beta. Availability is limited, so a beginner's starter kit should still work without it. The feature can reduce writing during a busy show, but it does not replace carrier postage labels.
Drop-off confirmation is part of the workflow. The October 9 scanner guide describes the replacement for the old Mark Package as Shipped button. The in-app scan sends the buyer a photo and updates shipping status. That gives your packing area a new requirement: an easy way to isolate one finished parcel in a photo near hand-off. Keep other buyers' labels out of the frame.
Three labels, three jobs
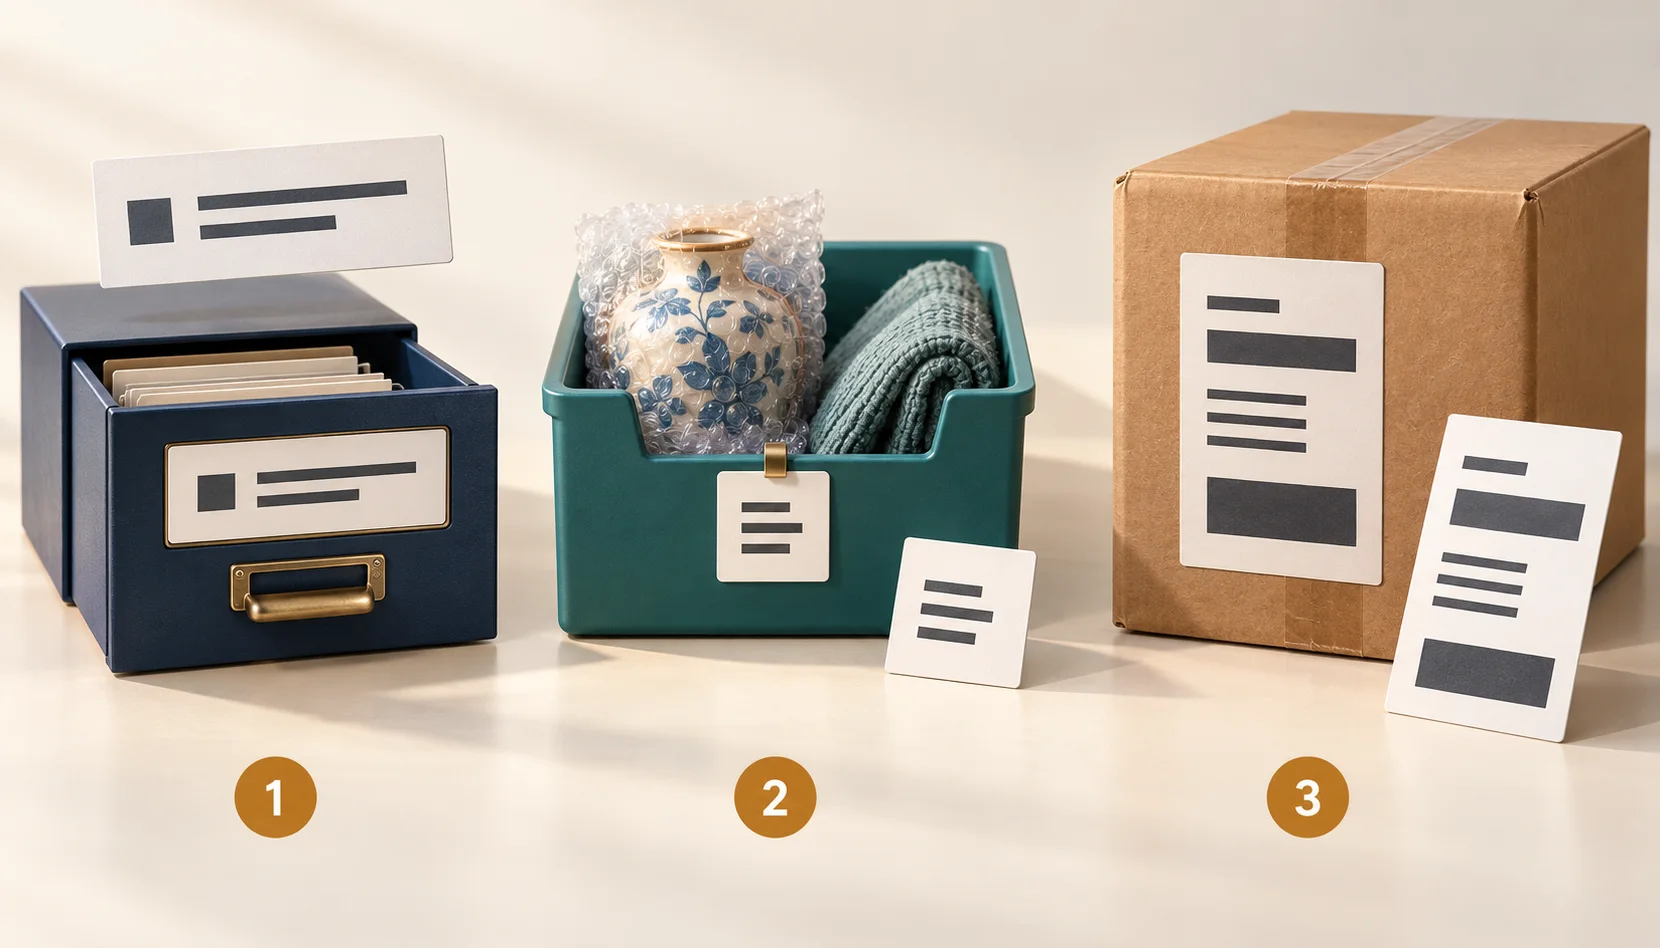
Most label confusion starts with treating all stickers as interchangeable. Keep the purpose visible on your supply shelf.
| Label | Useful contents | When it is made | Stock to consider | What it does |
|---|---|---|---|---|
| Inventory label | Your SKU, brief description, shelf/bin location | Before the show | 4×2 direct thermal, or another size supported by your own inventory tool | Helps find the physical item |
| Sale-sorting label | Item and buyer details | As a sale is recorded | Depends on the actual sorting software | Helps associate sold items with buyers |
| Shipping label | Carrier's address, service and tracking information | After shipment review | 4×6 thermal; 8.5×11 for an ordinary printer | Identifies the actual carrier shipment |
A useful inventory template might say “SKU A104 / BLUE LINEN SHIRT / SHELF B2.” Keep it short enough to read at arm's length. A barcode is useful only if something in your process actually scans it; a clear human-readable identifier works without extra hardware.
Place strong adhesive labels on an outer bag, removable tag, or bin rather than directly on collectible packaging or delicate merchandise. If your tag is removable, test it on an inconspicuous expendable surface first. “Removable” is a product-specific claim, not a property of all thermal labels.
Whatnot offers carrier-label exports in 4×6 and 8.5×11. Bulk generation lives on the website; the mobile app generates labels one at a time. Packing slips are optional, and label export can include them. Whatnot currently does not provide a post-office QR-code printing route. Use Whatnot's labels unless approved for Bring Your Own Label.
RONGTA RP415: the exact printer to investigate
Read our RONGTA RP415-GW thermal shipping label printer review for the exact grey listing, genuine product gallery, connection cautions and practical 4×6 setup checks.
Research-based verdict
The RP415 is worth considering for a seller who wants a dedicated shipping-label station and is willing to verify the precise hardware variant and printing route before buying. The decisive test is whether the exact computer or phone can consistently print a readable Whatnot PDF at the correct physical size.
The verified Amazon listing is RONGTA RP415, ASIN B0GNGZ5TJD. Its model field identifies RP415-GW and its series identifies RP415. Check that the selected product still shows those identifiers; a similar photo or a broad RONGTA search is insufficient.
Rongta's family specification lists 203 dpi, a 108 mm print width, up to 150 mm/s printing, and media widths of 27–112 mm. It lists several interface configurations, including USB and USB/Bluetooth. Those family specifications are not proof that every retail unit contains every interface. Do not transfer Ethernet, AirPrint, Wi-Fi, or a different model's capabilities onto the selected Amazon variant.
Choose the printing route before installing anything: a computer printer queue, a supported phone app, or the manufacturer's browser-printing route. Rongta publishes separate RP415 computer drivers for Windows, macOS and Linux, alongside an iOS/Android app route. Match the software, operating system and connection to the exact unit you bought, then print one correctly sized PDF before attempting a batch. A successful phone-app print does not establish that a desktop printer queue is configured.
Questions to answer before buying
- Which exact model/variant will arrive, and who provides support?
- Are you printing from Windows, macOS, iPhone, Android, or more than one?
- Does that route print a PDF directly, or require an app import?
- Is the chosen connection USB, Bluetooth, or something else explicitly supported?
- Does the label width, backing width and feed format fit the unit?
- Are any holder, cable, hub or adapter costs missing from the headline price?
- Can you return the product under the listing's current terms if your required workflow does not work?
A sensible acceptance test
Start with the official driver and a single correctly sized test document. Check orientation, margins, feed alignment and readable small text. Then use an authorized real shipping-label PDF without exposing a buyer's information publicly. Print the same batch in the order you expect to pack it. Count the physical output. Reboot and reconnect before relying on the printer for a live session.
Record the connection and driver settings that worked. A small card near the printer can contain “stock size / paper setting / connection / calibration steps.” This is especially useful when someone else helps pack.
For a review update, record setup time, successful labels versus attempted labels, time for a defined batch, reconnect behavior, and any cropping or feed errors. Until those measurements exist, claims such as “never jams,” “works instantly,” or “the fastest Whatnot printer” do not belong in the verdict.
RP415 and Whatnot Tray: still a verification step
Ordinary PDF printing does not prove RP415 compatibility with Whatnot's live Sorting Labels beta. If your seller account has access, open the show on Whatnot's website and choose More > Seller Tools > Sorting Labels. Enable the feature, connect Whatnot Tray, select the installed printer and correct label size, choose the fields, and print a test label. If the printer is missing, first confirm it appears in the computer's printer settings. We have not independently tested RP415 interoperability with this beta.
4×6 shipping labels: prioritize reliable feeding and readability
Buy direct-thermal stock if your printer uses direct thermal. Printer paper for laser or inkjet use will not substitute, and thermal-transfer material can require a ribbon-based printer. Match the media to the specific machine.
For a compact station, fanfold labels can sit behind the printer and travel through a straight path. Leave room for the stack to feed without dragging against the wall. Roll labels need a supported roll arrangement, with the right core and outside diameter or a suitable external holder. Choose the format that fits the bench rather than buying by label count alone.
The Rollo 4×6 fanfold 500-label listing is a documented candidate for comparison. Confirm count, perforation, stock type and printer fit on the exact listing. A brand appearing in another printer's compatibility list does not establish every possible media combination.
Before buying a case, test a small pack on your actual packages. Print ten labels, inspect feed alignment, attach them to both a mailer and a corrugated box, and check for edge lifting. Keep labels clean, flat and easy to scan. Place the label on a surface large enough to support it without wrapping the barcode around an edge.
Calculate the useful unit cost
Divide the delivered pack cost by usable labels, not merely advertised labels. If a pack contains 500 labels but your setup wastes 20 during calibration or errors, your practical denominator is 480. Track avoidable waste before changing brands.
A batch of 30 shipments with one printed packing slip per shipment may use 60 pieces of stock if both are on thermal labels. That is a planning example, not a Whatnot requirement. A digital check or ordinary-paper slip may be adequate for your process.
4×2 inventory labels: useful space, separate software decisions
A 4×2 label provides room for a legible SKU and short description. It is a sensible format for bagged inventory, shelf tags and your own item-identification workflow. Its value comes from consistent information and placement, not the size alone.
MUNBYN's 4×2 rectangle roll is described as 500 direct-thermal labels and is intended for mailing/barcode identification. The manufacturer page displayed $13.99 when retrieved October 13, 2026; this is a manufacturer-page observation, before any unverified taxes or shipping, not a guaranteed Amazon or checkout price. It specifically excludes Dymo and Brother in that listing's compatibility note.
Use your inventory app or design tool to create the correct 4×2 document. Set the printer driver to match the actual stock. Try a short SKU, a long item name and a second line of location text before printing hundreds.
The official Sorting Labels limitation
As checked October 13, Whatnot's supported beta layouts are 2×1, 1×1, 4×6 and 2×3 inches. A native 4×2 preset is not listed. Whatnot permits a supported layout no larger than the physical stock in either dimension. On 4×2 stock, 2×1 is geometrically smaller; that does not independently prove feeding or driver behavior on your printer. Recalibrate and test. Do not choose 2×3 for a 4×2 sheet: three inches is taller than two.
A 1×1 software option also does not guarantee every printer accepts one-inch-wide media. The RP415 family page's minimum media width is 27 mm, while one inch is 25.4 mm. Check actual backing width and the retail unit's manual before selecting that stock.
One printer or two?
Begin with one if stock changes are infrequent. Separate inventory prep from shipping so you are not swapping media every few minutes. Add a second printer only when switching, calibrating and checking settings repeatedly interrupts packing or when live sorting must run while shipping labels print elsewhere.
Label both machines physically: “INVENTORY” and “SHIPPING.” Distinct printer queue names reduce the chance of sending a batch to the wrong stock. A second printer adds another device to maintain, so include that overhead in the decision.
“Mylar bags” or poly mailers? Buy the material your shipment needs
For ordinary clothing shipping, the product to search for is usually a self-seal poly mailer. Many common mailers use polyethylene. Mylar is a polyester-film brand, and true Mylar-type packaging is a different material family. A shiny finish does not tell you whether a bag is suitable for a particular shipping job.
Keep three categories separate in your cart:
- Plain poly mailer: flexible outer shipping bag for suitable nonfragile contents.
- Padded or bubble mailer: adds cushioning, but still offers limited crush resistance.
- Barrier pouch or product bag: may be inner packaging rather than an appropriate shipping envelope. Check the material, closure and intended use.
Two exact listing-based candidates are Fuxury white 10×13 mailers, 100-pack and METRONIC white 14.5×19 mailers, 100-pack. Both are ordinary unpadded poly mailers. The smaller size is a candidate for folded apparel, while the larger is a candidate for bulkier soft goods; neither fit has been hands-on tested here. Check the selected variant and usable dimensions.
For apparel, start with one size that fits your most common folded item and one larger size for realistic bundles. Avoid buying five decorative sizes before learning what your orders look like.
| Starting size to test | Possible use | Check before committing |
|---|---|---|
| 6×9 or 7.5×10.5 | Small soft accessories | Space taken by thickness and the seal |
| 9×12 or 10×13 | A folded shirt or modest apparel order | Garment bulk varies substantially |
| 12×15.5 | Several thin garments or a larger piece | Complete bundle must close without straining |
| 14×19 or nearby seller-specific size | Bulky soft goods | Large bag is not protection against crushing |
| Plain corrugated box | Fragile goods, rigid retail packaging, mixed bundles | Protective space, weight and exterior dimensions |
These are starting points for fit tests, not guarantees. EcoEnclose's apparel chart uses comparable size ranges and recommends samples. Measure the item after folding and include thickness; a flat bag's dimensions are not the dimensions of a rigid box.
Do a trial pack with your largest likely garment or bundle. Close the bag without pulling hard on the seam. Verify that the adhesive reaches a clean flat surface and that the carrier label has a stable landing area. A low per-bag price is poor value if you routinely double-bag or replace split mailers.
For category-specific exceptions, follow Whatnot's guidance: raw comics need rigid support and a comic mailer or box; graded comics and sealed wax require boxes. Cards need protection against bending and movement, and high-value cards require the specified sleeve/top-loader protection. Plain clothing mailers are not a universal supply for every category.
Automatic tape dispensers: an upgrade for repeated cuts
An automatic dispenser makes the most sense when the same few tape lengths appear throughout your packing routine. It can put a ready-cut strip within reach while you keep the package stable. If nearly everything ships in a self-seal mailer, the machine may have little work to do.
First decide which tape system you need. A pressure-sensitive dispenser feeds self-adhesive tape. A water-activated tape machine wets gummed tape before application. These are separate purchase categories; confirm your tape and machine belong together.
The START International ZCM1000 is a documented pressure-sensitive candidate: the manufacturer lists 7–51 mm tape widths and preset cuts from 20–999 mm. It also identifies a separate ZCM1000T thin-tape version. That distinction matters when you use thin polypropylene packing tape. Verify exact tape suitability rather than treating all “M1000” listings as equivalent.
For comparison, the Uline H-1036 is a water-activated kraft-tape machine with a reservoir. It illustrates the different equipment category; it is not a default beginner recommendation.
Check these specifications
- Tape type and width, including whether your nominal two-inch tape fits the stated range.
- Core diameter and maximum roll diameter.
- Minimum and maximum useful cut length.
- Feed mode: button operated, sensor triggered, or programmable sequence.
- Blade/roller replacement availability and cleaning procedure.
- Outlet location, power supply and safe placement away from the camera and packing clutter.
- Exact manufacturer, model and support source. Similar housings do not prove the same mechanism or warranty.
Keep fingers away from the cutting outlet and follow the manual when clearing jams. A tape gun or manual dispenser also gives you a fallback if the powered unit is unavailable.
A practical upgrade calculation
Time 20 ordinary packages with your existing process. Record the share of time spent finding, pulling and cutting tape. Then estimate conservatively what a dispenser could remove. If it saves 10 seconds per package over 100 packages a week, that is about 16.7 minutes weekly. At an assumed $20/hour value for your time, that is about $5.56 per week before maintenance, setup or consumables. These numbers are an illustration, not product test results. Use your own measurements to decide whether the expense is justified.
Shelving: match the storage to the order flow
Shelf width is useful only if the containers fit between the posts. Shelf depth matters only if you can reach the back without disturbing the front. Measure your actual bins, not a photo of somebody else's packing room.
Use four visibly separate areas:
- Ready to sell: identified inventory waiting for a show.
- Sold, needs checking: items associated with buyers but not yet reconciled into shipments.
- Checked, ready to pack: complete shipment groups.
- Sealed, outgoing: packages ready for the correct carrier hand-off.
An additional exception tray is valuable for a payment issue, cancellation request, missing item or incorrect label. It should never resemble the outgoing lane.
Wire shelving offers visibility and adjustable positions. Small loose objects may need bins or suitable liners so they cannot fall through. A stationary unit can be a better fit than wheels when you do not need mobility. If you do use casters, check the manufacturer's separate load limits for stationary and moving use, and lock the unit during packing.
A documented larger-station candidate is the Seville Classics WEB562 five-tier 48×18 rack. Its manufacturer specification lists 800 lb per shelf and 4,000 lb total on leveling feet, but only 500 lb total on casters. Those are different configurations, not interchangeable ratings. This rack can be excessive for a first small show; confirm room and bin fit first.
Do not treat an entire rack's capacity as the capacity of one shelf. Distribute loads according to the exact manual, put heavier items lower, and follow anchoring and tip-restraint instructions. Leave doors, aisles and the printer feed path clear. Tall empty cardboard boxes belong somewhere they cannot fall into the work surface.
A solo-seller workflow that can recover from interruptions
Before going live
Prepare a modest set of numbered or SKU-tagged items. Keep your item name consistent enough that a packing record can distinguish “blue shirt size M” from “blue shirt size L.” Put a marker and backup tags within reach. Position sold-item bins where you can place an item without crossing it over unsold inventory.
Test the printer and check supplies before the show. Keep a spare label pack available, but avoid opening every pack; dust and handling are easy sources of avoidable mess. Put your most-used mailer size in front, the larger size behind it, and the box supplies in a separate lane.
During the show
Associate the sold item with the exact buyer and sale immediately. Keep identification attached to the item or its protective bag, not only to a loose pile. If something is unclear, place it in the exception area while you verify it. A short pause is preferable to a confident guess that becomes a shipment error.
If your account has the official beta, it requires Whatnot Tray 2.2.6 or newer, an installed printer, a running computer and the show kept open on that computer. Phone hosting is still possible. Keep manual tags ready for interruptions.
After the show
Treat your buyer bins as staging, then reconcile against the actual Shipments page. Smart Bundling can produce more than one shipment for a buyer. The physical packages must match the shipment groups; a username alone is not sufficient evidence that everything goes in one box.
Work on one active parcel at a time until the routine is dependable. Put all its items on the bench, compare identifiers, select packaging and protective material, then check the complete packed weight and exterior measurements. Keep unrelated shipping labels away from the active parcel.
Finalize bundle changes before generating labels. Manual bundling is allowed for the same buyer before label generation, including eligible show and marketplace purchases. Unbundling has different timing rules and can add cost, so review the adjustment shown. Do not combine physical packages while leaving separate shipments in Seller Hub.
Print and match the carrier label, complete the final contents check, then seal and move the parcel to outgoing. If interrupted, leave a visible “CHECK AGAIN” marker. Never use your memory of the previous step as the only indication that a package is complete.
A two-person workflow: make the hand-off explicit
Two people can move faster, but they can also create two versions of the truth. Assign roles for the batch.
Person A: pick and verify. Retrieve the items for one confirmed shipment, compare identifiers and quantities, choose appropriate packaging, and place a visible completion marker with the group.
Person B: pack and dispatch. Recheck the shipment identifier, package the items, verify weight/dimensions, match the carrier label and move the sealed parcel into outgoing.
Both people should use the same batch order. If one works alphabetically and the other follows print order, they need an explicit identifier at the hand-off. Never leave two open parcels and two unattached carrier labels in a shared space without clear separation.
Return exceptions to a named person instead of leaving them between workstations. When a label is replaced, remove the obsolete version from the bench immediately and make it unmistakably unusable. End with a count: shipment groups expected, parcels packed, exceptions unresolved and parcels handed to the carrier.
This is a suggested process design, not a promise of a specific throughput increase. Measure accuracy before measuring speed.
Finish at the carrier, not at the printer
For the in-app scanner, attach the label first and scan the actual package near drop-off. Whatnot asks sellers not to scan a screen. Keep the photo limited to the correct parcel because the buyer receives it. The app's confirmation and a carrier's acceptance scan are different records.
A USPS SCAN Form is a separate carrier tool for eligible U.S. domestic USPS shipments. Whatnot requires generation on the same day as the shipping labels, one show at a time, and allows only one generation, so download it immediately. International shipments are excluded, and canceling a label invalidates its form.
The Whatnot Manifest is another distinct feature and remains limited-release. Most beginners should not buy equipment or design their routine around having access to it.
Build the station in stages
The following dollar amounts are spending caps for planning, not verified shopping-cart totals or product-price quotes. Reuse suitable equipment you already own and stop at the stage that solves your current problem. Taxes, delivery charges, inventory and postage are excluded from these illustrative caps.
| Stage | Illustrative budget ceiling | Priorities | Delay |
|---|---|---|---|
| First small show | $75 | Category-safe packaging, scale access, tape, marker, existing printer | Powered dispenser, branded packaging, large rack |
| Regular solo packing | $200 total setup cap | Dedicated printer if needed, 4×6 stock, two fitted mailer sizes, simple bins | Second printer, bulk custom bags |
| Organized repeat seller | $400 total setup cap | Fitted shelving, reserve consumables, dedicated inventory labels if useful | Automation without measured need |
| Repetitive production | Quote-based | Dispenser matched to actual tape, dedicated workstations, possibly a second printer | Unverified clones and unsupported integrations |
These budgets can be insufficient for some categories or hardware choices. Fragile collectibles may require more protective packaging than apparel. Do not force a safe packing method into an arbitrary cap.
A useful reorder formula is average weekly consumption multiplied by replenishment lead time, plus a buffer you choose. If you use 80 shipping labels weekly, replenishment takes two weeks and your buffer is 40 labels, the reorder point is 200 labels. Calculate mailers and labels separately: one shipment can use more than one internal label.
Mistakes worth preventing before your first batch
- Buying inventory labels and expecting them to work as postage labels.
- Assuming Bluetooth means AirPrint, or a mobile app means desktop Tray support.
- Copying an RP421 or RP425 capability into an RP415 review.
- Treating a supported software layout as proof that the printer accepts that stock width.
- Forgetting to recalibrate after a stock change.
- Purchasing “Mylar bags” without confirming whether the intended product is a poly mailer.
- Stretching a mailer around bulky contents until the closure is under tension.
- Using Priority-branded packaging with a Ground Advantage label.
- Weighing only merchandise and omitting the box, padding and protective packaging.
- Combining one buyer's physical items without checking the recorded shipment grouping.
- Bulk printing in an order that does not match the packing queue.
- Calling a research-based shortlist a tested ranking.
Questions new sellers usually ask
Do I need a thermal printer immediately?
Printer access is necessary; a dedicated thermal model is an upgrade. An existing document printer can handle the supported letter-size export. Decide based on your time spent preparing labels and how regularly you ship.
Can one thermal printer handle 4×6 shipping labels and 4×2 inventory labels?
Potentially, if the exact printer supports both media and your software provides the correct layouts. Check the driver, stock backing and feed method. Switching between tasks adds setup work, so separate them into batches.
Are 4×2 labels a native official Whatnot Sorting Labels option?
No native 4×2 preset is listed in the official beta documentation checked for this guide. See the sizing section above before selecting smaller-layout workarounds.
Should a beginner buy an automatic tape dispenser?
Only if repeat tape cutting is already significant enough to justify it. A self-seal apparel-mailer workflow and a repetitive carton workflow have different needs.
Can I hold orders all week to build bigger bundles?
Do not assume that. Whatnot's October 6 Weekly Bundling guide lists seller availability in Australia, Austria, Canada, Germany, Japan, the Netherlands and the UK, not the U.S. Both sides must opt in. Standard orders still follow normal deadlines.
What should I buy first?
Buy the supplies necessary to protect and identify the items you actually sell. Then reduce the slowest reliable step. An organized, tested station is more valuable than a long cart of equipment you have not fitted into a process.
Explore more buying guides or read how we research products.